


Products
Solutions
Resources
9977 N 90th Street, Suite 250 Scottsdale, AZ 85258 | 1-800-637-7496
© 2024 InEight, Inc. All Rights Reserved | Privacy Statement | Terms of Service | Cookie Policy | Do not sell/share my information

Steve is an electrical foreman on a project. Yesterday he created a daily plan that was reviewed by his superintendent, Paul. He is now preparing for the morning meeting and getting ready to execute the daily plan.
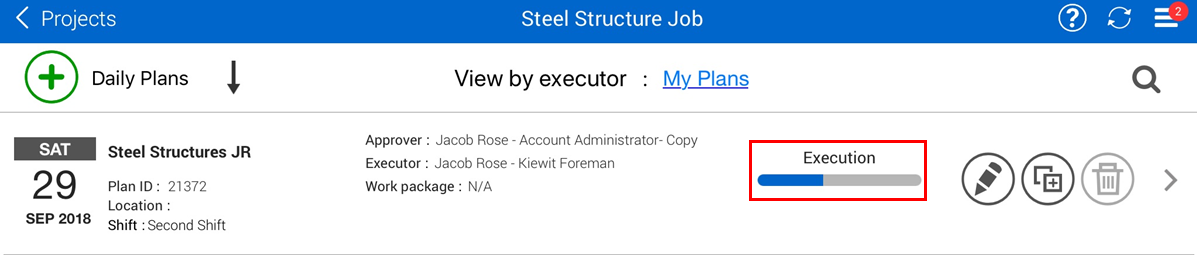
You access a daily plan from the list of daily plans. Note that the current status is now Execution.
Navigating through the Daily Execution Phase is very similar to the Daily Planning Phase. The same navigation bar appears at the top of the screen and you work though each tab to review the plan information and enter actual data. The tabs in the navigation bar are the same as in the planning phase except you are now able to access the Sign Out tab.

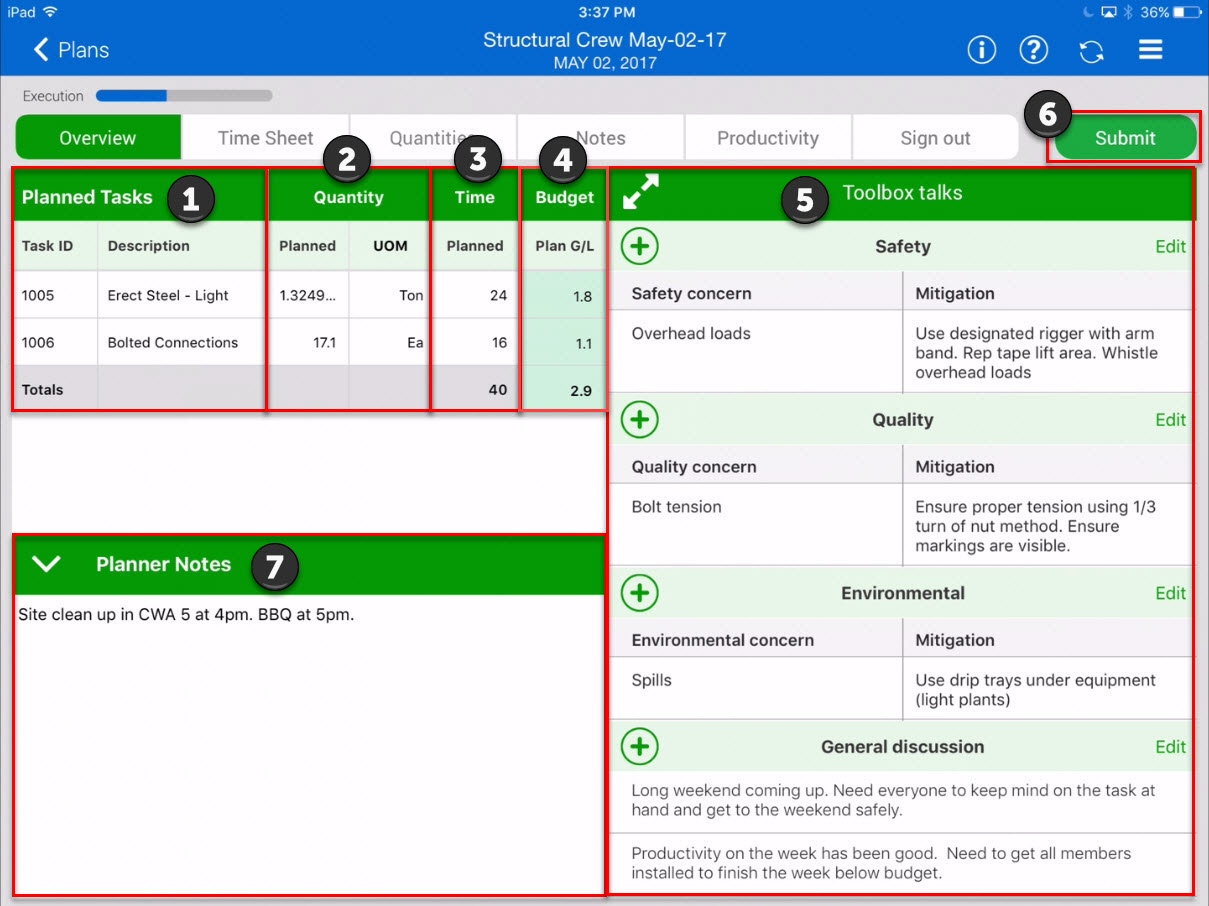
The first tab that you open to is the Overview tab. The Overview tab contains key information you would want to review with your crew at the start of the shift such as:
Planned tasks
Planned quantity for each task
Planned budget
Tool Box Talks (Safety, Quality, Environmental, and General Discussion)
Planner Notes
|
Title |
Description |
|
|---|---|---|
|
1 |
Planned Tasks |
Displays the Task ID and Description of each planned task. |
|
2 |
Quantity |
Displays the Planned Quantity and Unit of Measure for the task. The Planned Quantity comes from information entered during the planning phase. |
|
3 |
Time |
Displays the planned hours for the task. |
|
4 |
Budget |
Displays the planned gain or loss in manhours by comparing the planned hours and planned install quantities to the budget unit rates. |
|
5 |
Tool Box Talks |
Contains plan information on Safety, Quality (Quality Concern and Mitigation), Environmental (Environmental Concern and Mitigation), and General Discussion. |
|
6 |
Submit |
Once the plan is executed and all data has been entered, you can tap the Submit button to send the daily plan to the approval phase. You can access the submit button while working in any of the daily plans. |
|
7 |
Planner Notes |
Shows general notes input during the planning phase. During execution phase this block is not editable. |
In the Time Sheet tab, the planned tasks, resources and hours are all displayed. As the day progresses you can enter in actual hours for each resource and task. If you need to add tasks or resources, you can do it here as well.
|
Title |
Description |
|
|---|---|---|
|
1 |
Add |
Allows you to add additional tasks, employees, and equipment to the Time Sheet. You can also create temporary tasks, employees, and equipment. |
|
2 |
Clear Hours |
Allows you to clear all the hours from the Time Sheet. For instance, if you copied a daily plan and copied in the hours worked by the employees you can clear it out for the new task. |
|
3 |
Tasks |
The work operations to be completed. These are also the cost codes you are charging employee time to. |
|
4 |
Reorder |
Allows you to reorder the list of items in the time sheet any way you want, by tapping and dragging the item. |
|
5 |
Employees & Equipment |
Displays the employees and equipment assigned to the Time Sheet. |
|
6 |
Hours |
Displays the actual hours each employee worked. These fields should be edited to reflect what employees actually work on and for how long. |
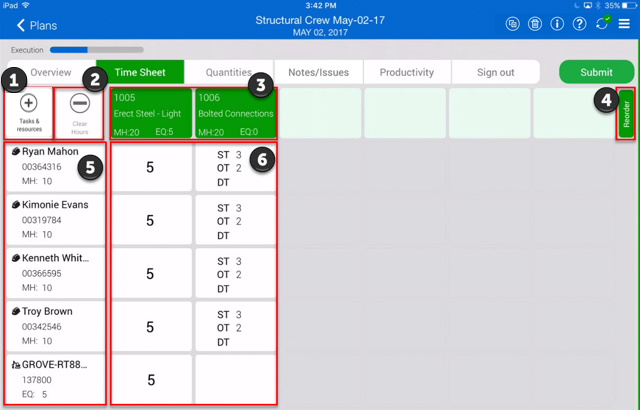
To enter hours for equipment and crewmembers, you click on the hour box under each task and next to the crewmembers’ name
A window appears where you can enter ST (Straight Time), OT (Over Time), or DT (Double Time)
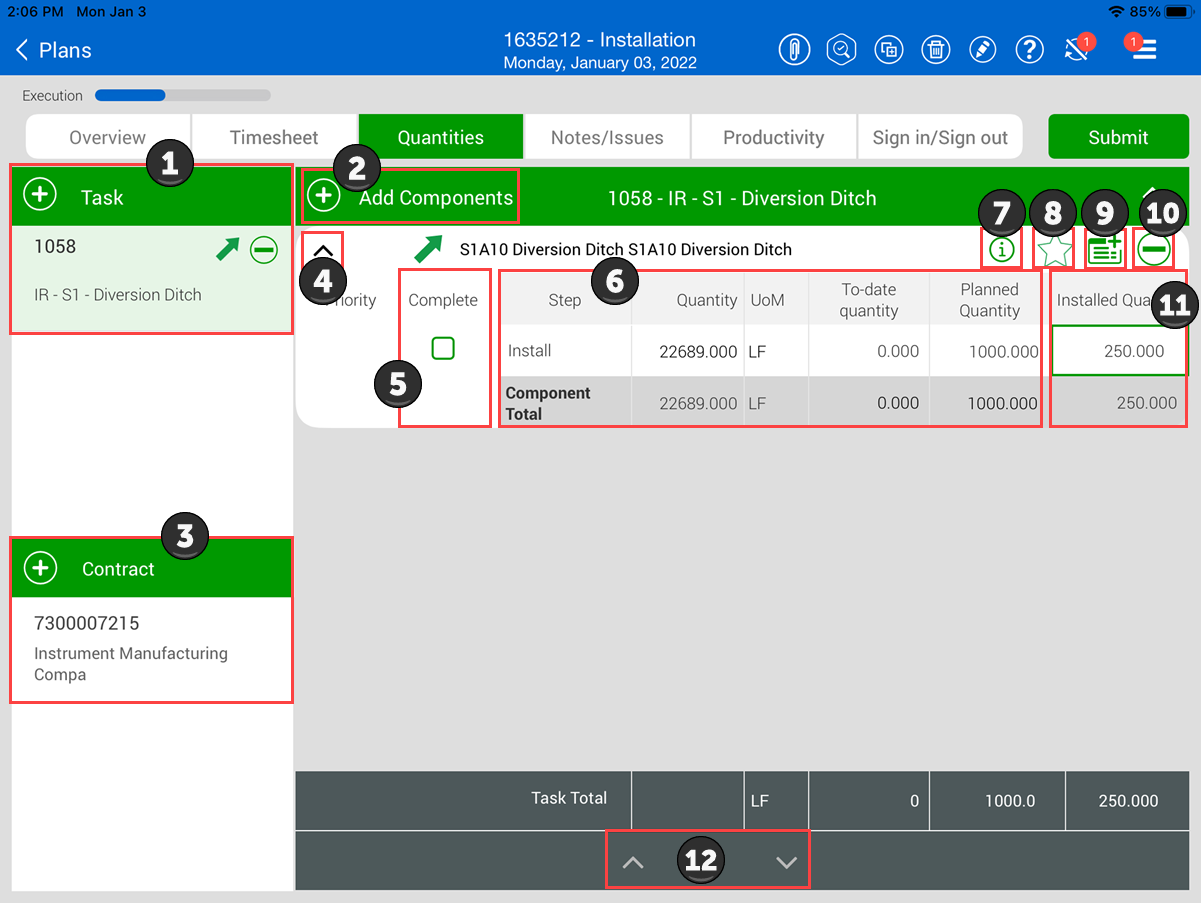
In the Quantities tab, all the components that were included in the planning process for each task are shown. Actual quantities are claimed by entering the quantity or tapping the Complete check box. You can add or delete components at this point if required.
|
Title |
Icon |
Description |
|
|---|---|---|---|
|
1 |
Add task |
|
Lets you add tasks. You can also add temporary tasks. |
|
2 |
Add Component |
|
Lets you add components for the task or contract selected in the left side panels. You can also add temporary components. |
| 3 | Add contract | Lets you add contracts. | |
|
4 |
Expand / Collapse Icon |
|
Selecting these icons will either expand or collapse the component details. |
|
5 |
Complete check box |
|
Check this box when the component of the task is complete. |
|
6 |
Component breakdown |
Displays the Planned Quantity and what is claimed to date. Displays the claiming steps or rules of credit for that specific component. This area is greyed out because it is not an editable field. |
|
| 7 | Information |
|
Shows a description of the component. |
| 8 | Favorite |
|
Adds the component to your favorites. |
|
9 |
Notes |
|
Allows you to add notes and issues to the components. |
|
10 |
Delete |
|
Tap this icon to remove the component. |
|
11 |
Installed Quantity |
Enter the numerical value of the installed quantity for each claiming step here. Checking the Complete box will auto populate this field with the total quantity. |
|
|
12 |
Up and down arrows |
 |
Allows you to navigate through the different tasks. |
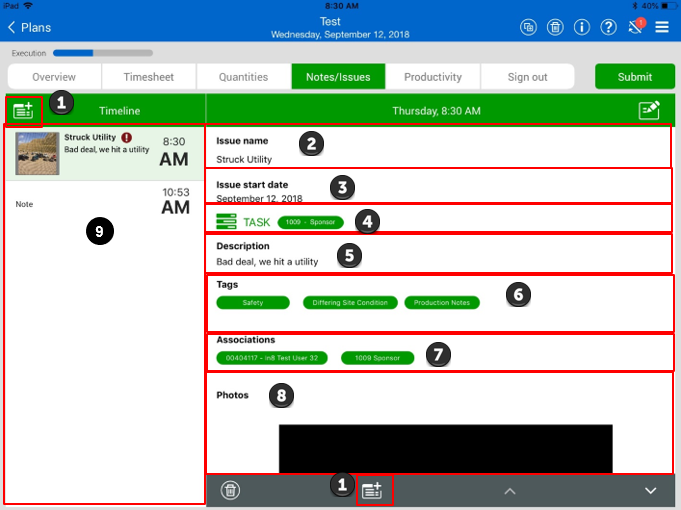
Use the Notes/Issues tab to add notes to your components or task, for example to provide additional information regarding the operation you performed for the day, the performance results, quality issues, environmental compliance and many more.
Along with the note/issue, you can add tags to associate the notes/issues with a pre-defined category. You also can add photos with your notes/issues.
|
Title |
Description |
||
|---|---|---|---|
|
1 |
Add |
|
Click either icon to add a note/issues to this daily plan. |
|
2 |
Name |
Displays the name of the note or issue. |
|
|
3 |
Date |
The start date of the note or issue |
|
|
4 |
Tasks |
Associates the note/issue to a specific task. |
|
|
5 |
Description |
A free text field of the description of the note/issue. |
|
|
6 |
Tags |
|
Allows you to tag the notes/issues to a certain category such as Safety, Quality, Environmental, Extra Work/Change, Delay, or Production Notes. To see this icon, you must click on the add button. |
|
7 |
Associations |
|
Allows you to add associations to your notes, such as task, employee, equipment, components, and vendors. To see this icon, you must click on the Add button. |
|
8 |
Pictures |
|
Allows you to take a photo and attach it with your notes, or to select a photo from the photo library. To see this icon, you must click on the Add button. |
|
9 |
Timeline |
Thumbnail view of all notes in daily plan organized in chronological order. |
|
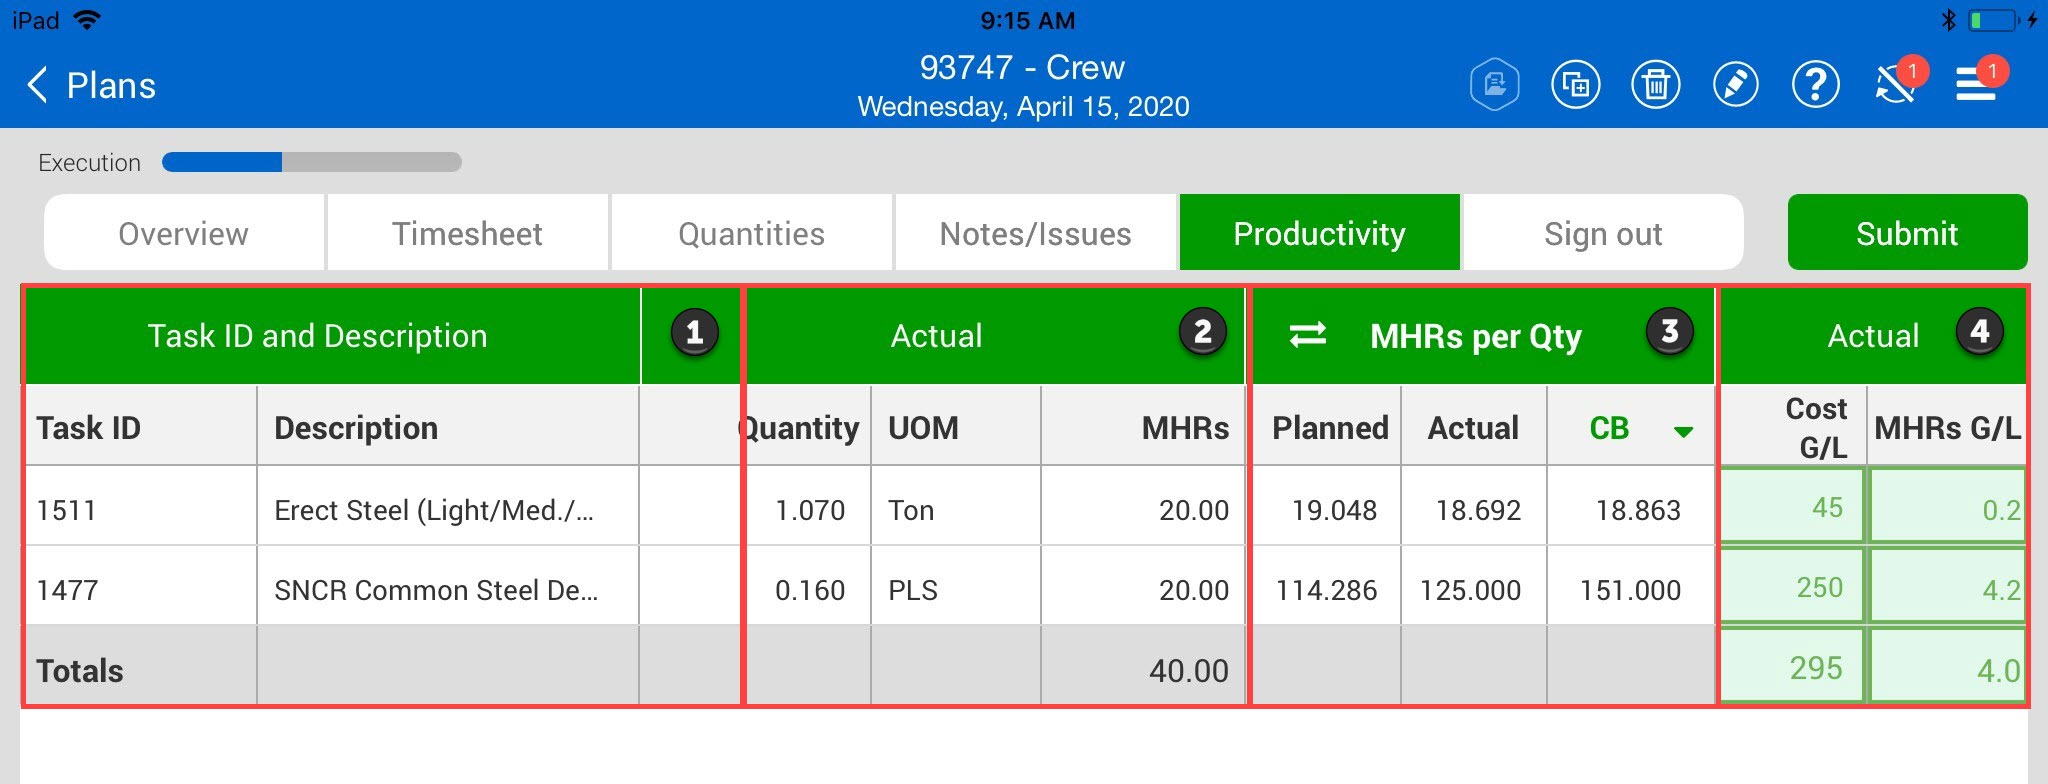
In the Productivity tab you can review your tasks, quantities, and hours claimed for the tasks, and compare the actuals to the planned quantities and hours as well as view your actual gain/losses.
|
Title |
Description |
|
|---|---|---|
|
1 |
Task ID and Description |
Displays the task ID and description. |
|
2 |
Actuals (UoM and MHRs) |
Displays the actual claimed quantities and man-hours. |
|
3 |
MHRs per Qty |
Compares the Planned versus Actual MHRs per Qty. You can select CE (Current Estimate) or CB (Current Budget) or Foecast or Goals. |
|
5 |
Actual (G/L) |
Compares actual cost or MHRs to budgeted cost or MHRs for each task and shows the gain or loss for each task. |
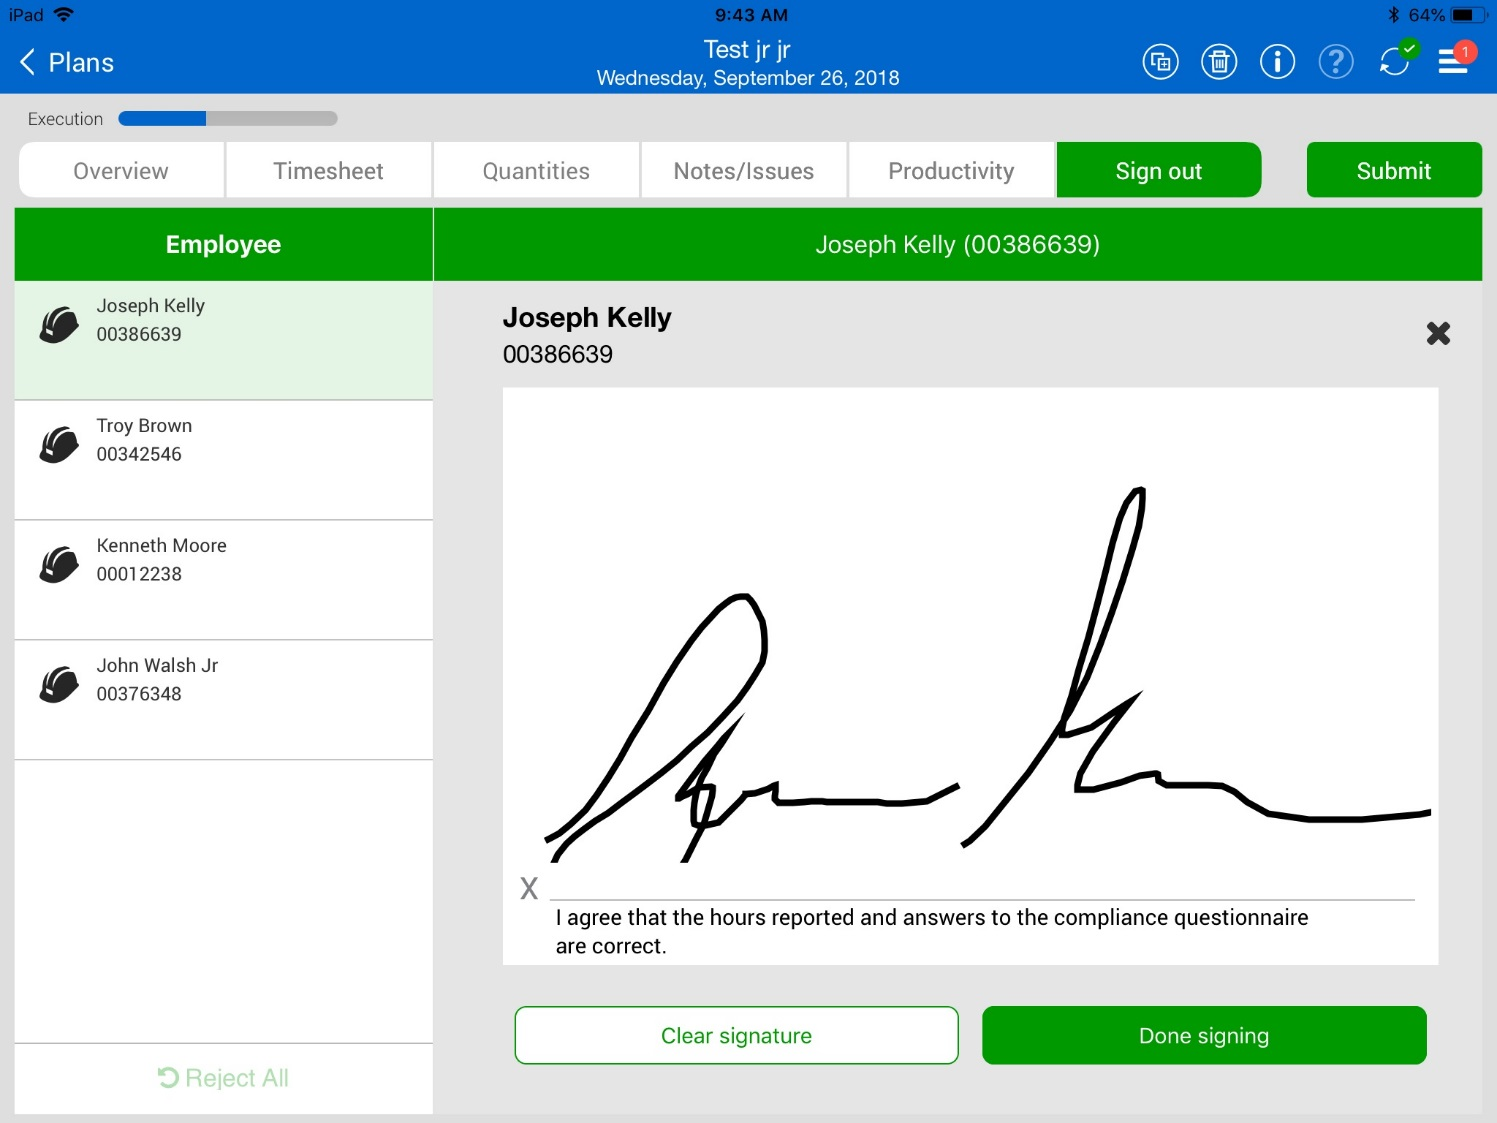
Before submitting a completed daily plan for approval, employees need to sign out by tapping their name. You enter the employee PIN (personal information number) which can be the birthdate of the employee or a number that the IT personnel has assigned to that employee.
The employee will be able to review the hours input by the Foreman before signing the card. At this point, they can agree or disagree with the hours and negotiate the hours before signing out.
|
Title |
Description |
|
|---|---|---|
|
1 |
Employee |
Displays all the employees including the foreman on a specific daily plan. |
|
2 |
Employee Name |
Displays the name of the employee selected to sign out. |
|
3 |
Employee Time Overview |
Displays a summary of hours for the day and week entered for that employee. |
|
4 |
As Employee/On Behalf of Employee |
There are two options for signing out: the employee can sign out, or the foreman with permissions can sign out for the employee. |
|
5 |
Employee Pin |
Where employees enter their pin numbers. |
|
6 |
Touch ID Signout |
User can use iPad thumb-print to sign out rather than entering pin. |
|
7 |
Sign out all |
Allows a foreman or executor to sign out all employees by signing out only once. |
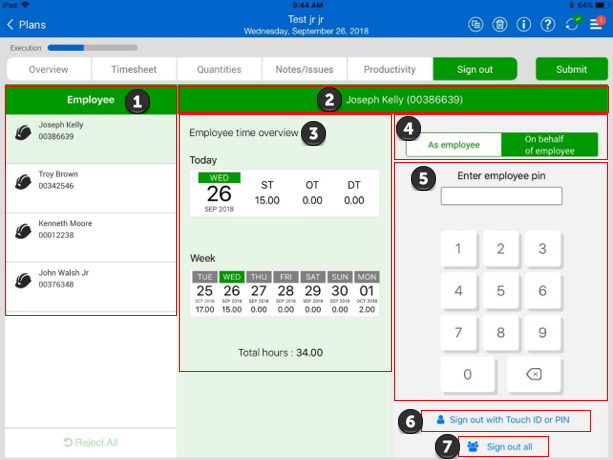
If employees sign out themselves, they have the option to either enter their pin or use an electronic signature on the iPad.
You can customize compliance questions for the specific needs of your company.
Like the planning phase, you must select Submit to send the daily plan to the Approval Phase. All employees must be signed out to submit the daily plan for approval. Tap the Sync button to push any updates to the InEight Cloud Platform.
Steve and his crew could execute the work on the jobsite and he was able to complete the Execution Phase of his daily plan by navigating through each tab of the navigation bar. At the end of the shift when all employees had signed out, he submitted the daily plan for approval.
Additional Information
9977 N 90th Street, Suite 250 Scottsdale, AZ 85258 | 1-800-637-7496
© 2024 InEight, Inc. All Rights Reserved | Privacy Statement | Terms of Service | Cookie Policy | Do not sell/share my information